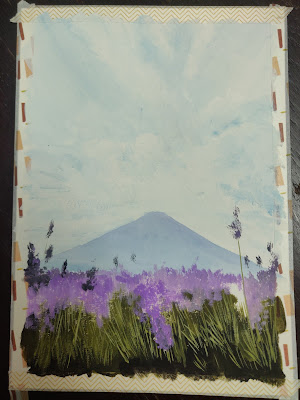
How I Painted This Dreamy Lavender Field In 10 Steps
As someone who romanticizes most things, I'm drawn to these fields in ways I can't explain and feel compelled to immediately replicate them in art.
But, but...painting lavender fields was always a pet peeve of mine until I learned how to do it correctly.
Of course, there is no 'right' way, but I studied enough lavender field references to figure out what I was doing wrong. And you can too.
I recently painted the lavender fields that line the shores of Lake Kawaguchiko in Japan. Apparently, they also offer stunning views of Mt. Fuji on clear days. I wanted the composition of the painting to be clean, simple, and elegant, allowing only the shroud of lavender to shine through.
Here are the colors I used to get it right:
Colors for This Lavender Flower Field Painting:
I used gouache colors by artistrybyaltenew to paint this artwork. You can use any basic gouache set or poster colors for a similar effect.
- For the Skies: A spot of Primary Cyan + White (you can use primary blue + white)
- For the Mountain: Prussian Blue + White
- For the Lower Field (foliage): Black + Yellow (for forest green color). Added yellow for lighter tones
- For the Lavender Field: Mix of Black + Lavender for the darker shades; mix of White + Lavender for the highlights
Other Materials I Used:
- Large flat brush
- Liner brush for grass
- Round brush for flowers
- A5 300 gsm paper
- Water
- Rag to Wipe Brush
- Masking Tape
You can also check the detailed process for this painting below:
Step 1: Start with the clouds. Paint the basic outline and rough cloud shapes with blue that we will later highlight with white.
Step 2: Add darker shades of blue where necessary.
Step 3: Etch out the basic mountain shape and add white highlights for the clouds.
Step 4: Block in darker colors for the grass, and mid-green tones for the middle foliage.
Step 5: Time to paint grass! Use a fine-liner brush and draw random strokes of grass on the blocked-out color.
Step 6: The topmost part of the field is where the lavender is most concentrated, from our perspective. Block in lavender color in this section.
Step 7: Don't paint over the green foliage but ensure that all parts are adequately covered and there are no white patches.
Step 8: Begin refining the shapes of the flowers. Lavender flowers typically have tapering shapes. Study a reference online and begin painting the flowers in all shapes or sizes.
Step 9: Paint a few rough strokes over the tip of the mountain to depict snow. Also, add more lavender flowers below, where the foliage is. Notice how I'm also painting a few flowers above the horizon line for a more realistic perspective.
Step 10: Add in darker lavender shades and highlights to give the flowers a multi-dimensional effect. I personally prefer a looser style of painting, but you're free to refine the flowers as finely as you'd like.
And here we have it - our lavender flower field painting in 10 steps! Do comment below if you found this helpful!If you do replicate this painting via my blog, please tag my Instagram handle artbyadva so that I can share your work on my story.
You can also purchase my original artwork on my Etsy Shop.


Comments
Post a Comment